


I am so thrilled to be guest posting here at Tatertots and Jello today. Thank you, Jen, for having me. :)
I do not know about you, but I am amazed at how quickly the school year is approaching. My boys start school next week! Wow!
(Yes, I might have just jumped into the air and clicked my heels together in glee.)
Just kiddin'...
No, I'm not. :)
To help your kids (or you) stay organized this school year, I thought I would share with you a very easy DIY magnet board that I made for my boys :)

This magnet board is the perfect place to store notes, reminders, or special keepsakes.
Here is how I made it (in less than an hour!)
I purchased a 24x24 inch sheet of STEEL from Lowe's for about $10.00. They have all different kinds of sizes, so you could make your magnet board smaller or larger if you wanted.
I also bought two 1x2s from Lowe's. Get the cheapest 1x2s you can find. These were $1.97 a piece.

For the embellishments, I bought three different types of "tacks."
Bronze furniture nails, Nickel furniture nails, and large head galvanized roofing nails.

I decided to go with the bronze furniture nails (upholstery tacks) for this project.
I started by using a hack saw to cut a piece of wood 24 inches long...

Then I used a straight edge to mark where I wanted my tacks to go. (You can space them however far apart you would like. You could also use different color tacks or large head wood screws.)

The upholstery tacks where not strong enough to go through the steel without breaking, so I created a starter hole with a nail.

Again, you can space the tacks apart at any distance you prefer.

The picture below just shows you how the wood was placed on each side. I would flip it over and nail the tacks into one side at a time.

After you finish nailing all the tacks in, you are done! How easy is that?!
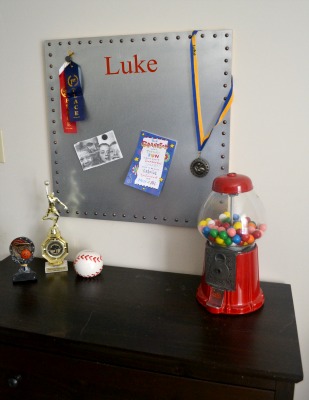
Now my magnet board was plain when I hung it in my boys' room, but I was wondering what it would look like with some lettering on it.
So I uploaded my pictures into Picnik and added my boys' names on the board to see what it would look like.
I loved it!!

So I am planning on creating vinyl cutouts of my boys' names using my Silhouette machine. If I didn't have a Silhouette, I would probably purchase some stencils and just paint their names on.

In the next picture, I added my son's name in blue to see how that would look...

CUTE!!!!
Now you are probably thinking that this type of board would only look good in a boy's room.
Oh no, my friends!
Look how cute the board looks in my office!!!....

I am needing a memo board for my office space, so I am thinking about purchasing a larger sheet of steel to go across my whole desk area. Wouldn't that be great?! Maybe I will use the silver upholstery tacks to give it a little more "bling". :)

Again...I love it! Who would think a piece of steel could look so feminine?
Here is the memo board with my favorite saying on it (added through the magic of Picnik, of course.)...
So there you have it! A great little magnet board for your child (or you) to start the school year off right!
For less than 20 dollars...."holla!"
And if steel on your walls is just not your thing, check out the tutorial on my blog to make "Ballard Designs Inspired Magnet Board."


You can learn how to make these through a written tutorial, or a video tutorial, whichever you choose. :)

Thanks Traci!!
What a great project.
And what a great idea as we all start thinking about school starting again!!
Traci is one of my favorite bloggers. Not only is she super talented, but she is also so warm and real.
Here are a few of my favorite Traci projects:


{I adore Traci's Laundry Room - so pretty!}

{Traci's Burlap Chair Makeover makes me happy}
And Traci's Wednesdays With Wanda touch my heart each week.
You will love getting to know Traci.
Head over to Beneath My Heart and say hello!
xoxo


0 comments:
Post a Comment