Pages

Subscribe:
Showing posts with label sewing project. Show all posts

Friday, August 19, 2011

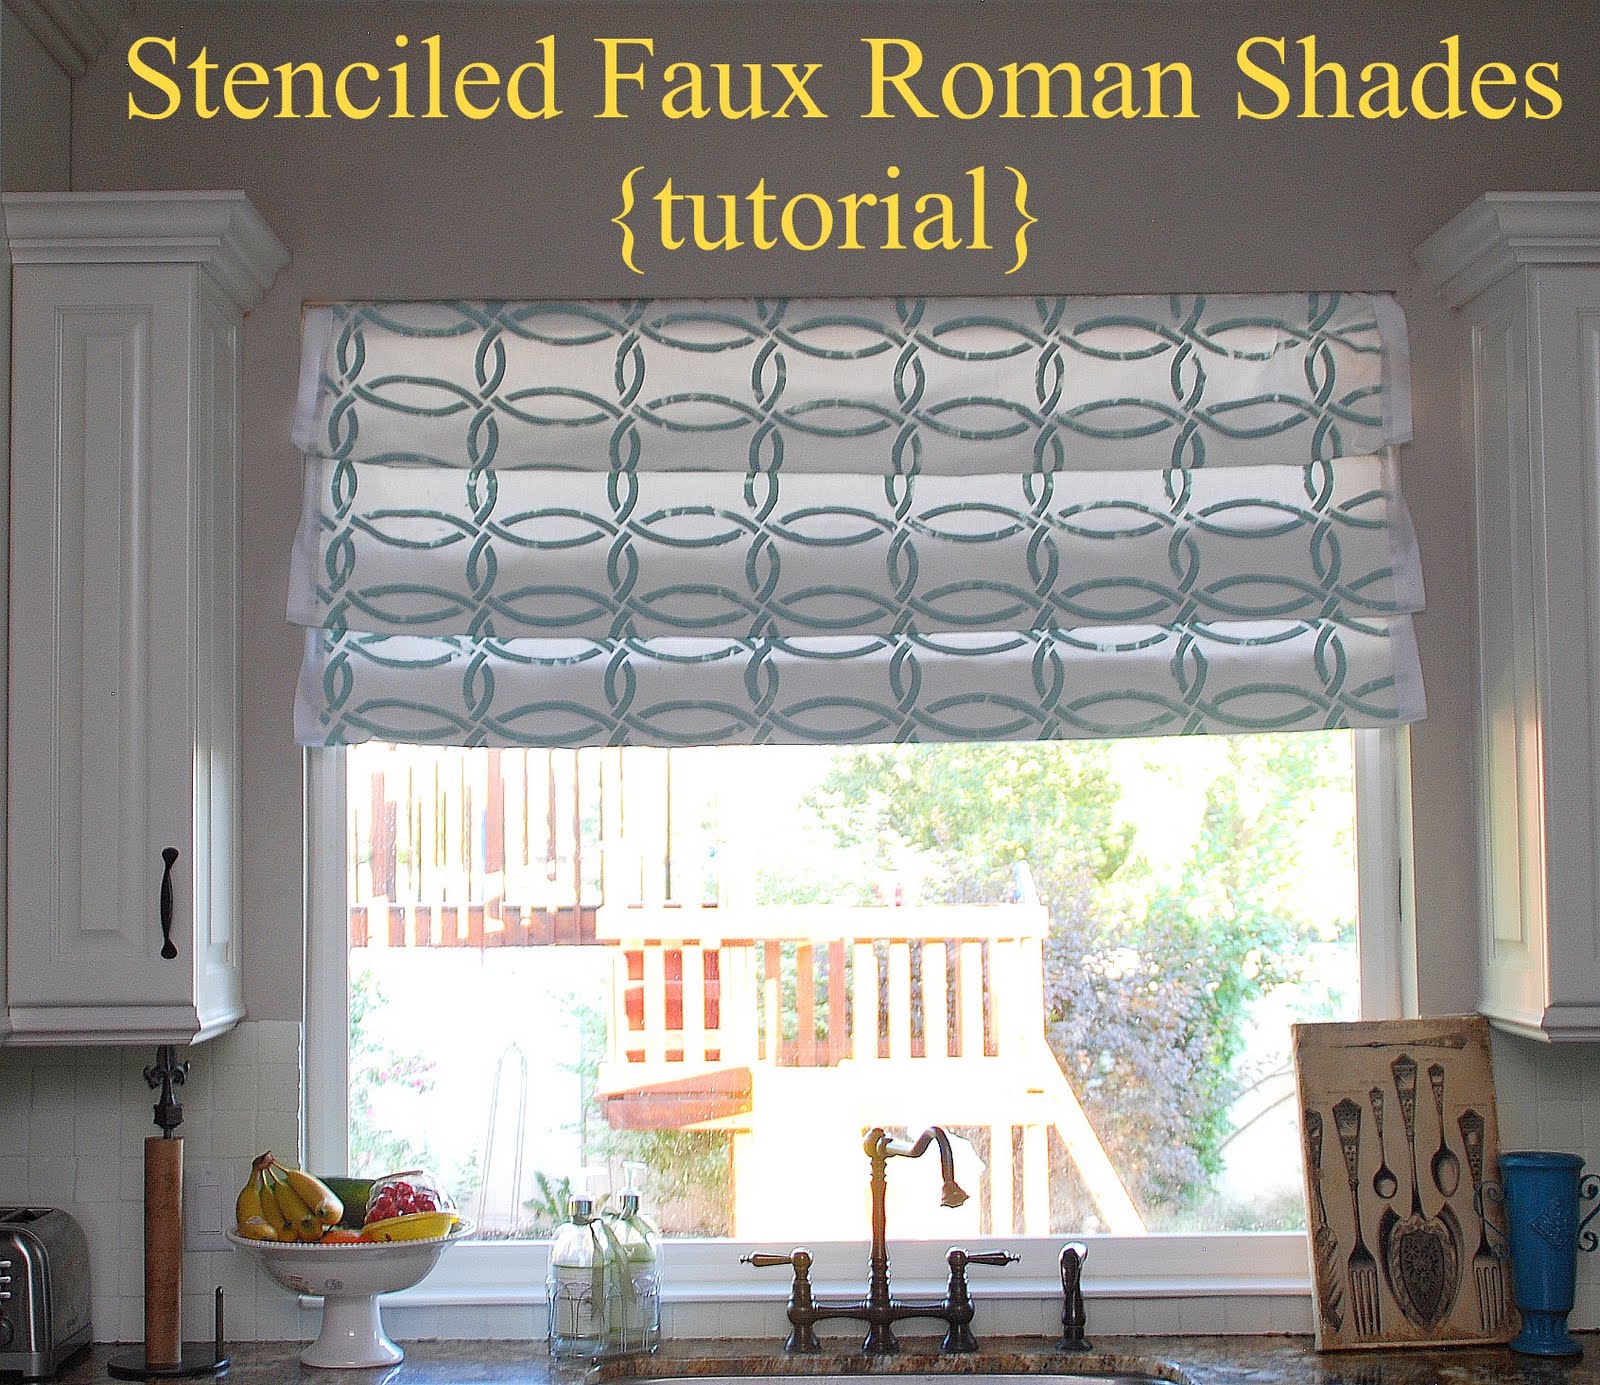
Stenciled Faux Roman Shades {tutorial} -- Kitchen Sneak Peek


I'm still working on my kitchen redo. I decided I wanted to change things up and make a Roman Curtain for the window above my kitchen sink. And in the spirit of keeping it real, I just want to let you know that the first version was a total sewing fail. I tried to make it no-sew AND Faux and let's just say that hot glue and white canvas do not mix LOL!


So I started over.


Here's what I did: 


1. I measured the window and added 3 inches to the length and 2 inches to the 2width. I used my Royal Design Studios Stencil -- Chain Link.


2. I found the easiest way to stencil the pattern was the Roller Lite Touch Up Kit from Home Depot.


3. I laid the stencil on the upper corner of the canvas. 


4. After each section, I matched the existing stencil up to the hash marks to be sure it was straight. 


5.I did this until the whole fabric was covered.


6. I used a iron to heat set the paint into the canvas.


7.I used an old bed sheet to make a liner. I stitched the sheet to the canvas, making a "pillow case" and then folded 2 inches at the top over to make room for the spring rod.


8. Then I inserted the rod into the casing and hung the curtain. 


Keeping it real -- I discovered that the curtain was a little small for the space, so I sewed some white grosgrain ribbon on each side of the curtain to make it fit the space better. I also think it dresses up the curtain. 


After I made the panel, I posted about it on my TT&J Facebook page, and mentioned was going to make it into a regular roman shade and then Richella from Imparting Grace sent me an email and told me about her "Faux Roman Shade Tutorial" and it was genius.


 [IMG_3532_2_4.JPG]

So I did that! I just inserted two more adjustable spring rods in the window opening and then just folded the panel over the rods to create panels. Be sure to check out her tutorial for more details!!


Super easy. And since I don't really need privacy in this window since it overlooks an open space, I thought this was a good solution!


I love that the paint in the curtain is the same as my kitchen island!! 


It was hard to get a picture of the actual color of the paint since the sun coming in the window made the paint look so much darker than it really is. The paint is really a really light bluish-green color. The name of the paint is Martha Stewart Rainwater.


I have to say that I love Royal Design Studio Stencils. Their stencils are made out of a heavier material that doesn't stretch, like some of the other stencils I have tried. And my favorite part? They have marks on the stencil that line up with the previous stenciled areas. So it is super easy to keep the stencil straight and lined up! And I love all of their modern designs!! You can find out about all of their designs at their main website!


Have a Colorful Day!! 


xoxo


PS -- It's Friday!! My favorite day of the week!! Why?? Because it's the day I get to see what YOU have been working on and feature YOU! Come link up YOUR ideas at the Weekend Wrap Up Party!! It starts at 6 pm {mst}.


book worm apple1 Nine {Free} Back to School Printables!


And, Are you getting for Back to School?? I am sharing NINE Back to School Printable Ideas over at Babble's Home Ec!!


 PPS -- I am linking up to these fun parties - check them out!


The DIY Show OffBCD 125UndertheTableandDreaminggiveawaysTidy Mom I'm Lovin It Fridays


Monday, April 25, 2011

Guest Project -- make a Mod Peacock Pillow with PDF{tutorial}


Today's tutorial is from one of my favorite bloggers. Amy from Positively Splendid. Amy is adorable and she has SPLENDID ideas. I had the treat of meeting her at Blissdom this year and then again at Creative Estates a few weeks ago. She is as adorable in real life as she is on her blog. 


 {here we are with Emily of Decor Chick and Jess of Frugal with a Flourish at Blissdom}

Hello, everyone! I am absolutely over the moon to be sharing a project here at Tatertots and Jello today! Jen's blog is among the first I ever followed, and I never cease to be inspired by her wealth of creativity. I've had the privilege to meet Jen in person twice now, and I have to say that she is just as charming in person as she is on screen!


My name is Amy, and my blogging home is known as Positively Splendid, a place where I share about my passion for all things creative. As a wife and mother of three (with our fourth due in the fall), I find pursuing creative endeavors to be the thing that preserves my own unique identity. I love taking ordinary ingredients and transforming them into something lovely!


My goal is for my blog to be a little haven of crafting and DIY inspiration, and a place where creative people of all skill levels can come and feel right at home. Because I feel strongly that everyone should be equipped to create something beautiful on their own, each and every project at Positively Splendid is explained to the last detail with step-by-step photo tutorials. I like to think of each tutorial as sitting down with friends to learn something new together! I would love for you to stop in for a visit!


Today I'm going to share with y'all a tutorial for how to create a vibrant and fun throw pillow cover to punch up your home decor. This project was inspired by this gorgeous rug I came across on Modern Chic Home a few weeks back.


All set to make a peacock pillow of your own? Let's get started!


For this project, you will need...


Printable Templates


An 18" pillow form


White cotton twill fabric


Washable ink marker


Freezer paper


Grey spray paint


Felt in assorted colors


Coordinating thread


Basic sewing supplies: Machine, shears, etc.


Optional: Rotary cutter and mat


Prep Work


Print off and cut out your feather template.


Cut your twill fabric to the following dimensions:


(1) 18.5 x 18.5" square


(2) 18.5 x 11.25" rectangles


step 1 / Trace your template onto your freezer paper your desired number of times, and cut out your shapes. For my pillow, I used 17 feathers. Use your washable ink marker to mark the precise center of your square piece of fabric. Iron one of your feather pieces directly over this mark, taking care to ensure it is straight. Now, iron your remaining feather pieces in your desired configuration around your center piece, making sure each feather is evenly spaced as you work. 


step 2 / Spray your fabric piece evenly with your paint, applying 2-3 light, even coats. When the paint has dried, remove and discard your freezer paper pieces.


step 3 / Cut 3 pieces of freezer paper to 8.5 x 11". Print the circle templates you downloaded above onto the dull (unshiny) side of your freezer paper. Note: For my pillow, I printed 2 sheets of the large circles and 1 of the small circles. Iron your printed templates onto your felt, distributing the circles among your different colors as desired. Carefully cut each of your circles out, and discard the freezer paper backing.


step 4 / From each of your small circles, cut a small notch, as shown. Carefully stitch these smaller pieces onto the lower portion of your larger felt circles. Place your stitched pieces at the bottom of the feather spaces on your pillow front, aligning them toward the bottom point of each feather. Carefully stitch around the perimeter of each circle to affix them to your pillow front. Repeat until each feather space contains a circle piece.


step 5 / Fold one of the long edges of one of your rectangle pieces under 1/4"; press. Fold under another 1/4"; press. Stitch this hem to secure. Repeat with the other rectangle piece. Lay your completed front panel on a work surface, right side up. Place one of your rectangle pieces on top of your front piece, right sides facing, so that the top edge and corners of each piece are aligned and the hem you just sewed runs through the center, as shown. Pin. Place your other rectangle piece over the other two pieces in a similar fashion, this time aligning the bottom edges and corners. Pin. Note: Then hemmed edges of your rectangle pieces will overlap by 3 inches at the center. Using a 1/4" seam, stitch all the way around your pinned pieces. Clip your corners, and turn your cover right side out. Slip your cover onto your pillow form.


All finished!


Thank you so much, Jen, for having me over today! I hope to see y'all over at Positively Splendid very soon!


Photobucket
Twitter: @splendidamy
Facebook: facebook.com/PositivelySplendid


Amy - that is just so cute. 

Amy has so many wonderful ideas, I don't know where to start. Seriously. 


{this is the first project of Amy's that I was introduced to -- Metal Flowers}


{She makes the most amazing pillows -- check out these Patriotic Outdoor Pillows}


{And I adore her Boy/Girl room -- she made all of the bedding -- amazing}


{And another Fab idea -- Personalized Nursery Canvases}

AMAZING!! 
Seriously, every single idea that Amy does is wonderful. You will want to see all of the new ideas at Positively Splendid!!

xoxo

PS -- I made over my front door and porch today. I can't wait to show you what I did. Here is a sneak peek: 


Have a great day!! 

xoxo


Sunday, April 3, 2011

Great Ideas -- Sewing Projects {1}


{I may be a little obsessed with making these Fabric Rosettes @ Kiki Creates }


{Get the 411 on how to make this Ruffled Easter Tee @ Positively Splendid}


{Find out how to make this adorable Ice Cream Shirt @ Serenity Now}


{These Easter Sock Vases make me smile @ JC's Loft}


{Make a Pennant Lampshade @ A time for Everything}


{This Hoot quilt is amazing @ iCandy}


{Check out the 20 different Doll Patterns @ Tip Junkie}


{Make an Emergency Clutch to keep in your car @ TidyMom}


 {Create a Screen Printed Bunny Outfit @ Girl Inspired}


 {Makeover an armchair with Ruffles @ That's My Letter}


{Get the 411 on how to Upholster an Armchair @ Vintage Revivals}


 {Check out this Thrift Store Transformation @ Faith, Trust and a Little Pixie Dust}


{Get the 411 on how to make these fun Butterfly Pillows @ Lady Crafter 14}


{Sew a Pleated, Wing Back Slipcover @ Crazy Wonderful}


 {Make a pretty Rosette Pillow @ Crazy Wonderful}


{Create a Stylish Wipe Case @ Curds and Whey}


{Get the 411 on how to make these Drop Cloth-lined Drapes @ Being Brook}


{Turn a Blah stroller into something extraordinary @ Laura Thoughts}


 {Find out how to recycle a favorite shirt @ Project Purple}


{Make a Ruffled Runner @ Naptime Journal}


{Make a Craft Organizer @ 2 Little Hooligans}


{Add some Oomph to a Shirt with Lace @ Maybe Matilda}


 {Find out how to make this Pretty Cardigan @ A Girl and a Glue Gun}


 {Get the 411 on how to make this Bow Shirt @ Copy Craft}


{Sew up a Bustle Back Dress @ Sweet Pea and Pumpkins}


{Sew some Ruffled Camera Straps @ My Greenbrae Cottage}


{Make a Anthro-inspired Dishtowel @ Sew Ronimo}


{Make a DIY Puppet Theater @ She Wears Flowers}


{Sew a whimsical Felt Flower Pillow @ Felt So Cute}


{Make a Sweater Egg Pillow @ Creative "Try"als}


{Make some Paper Bag Shorts @ Homestitched}


 {or a Women's Paper Bag Skirt @ Yelllow Songbird}


 {And a Pretty and High-Waisted Apron @ Blissful and Domestic}


{Make an Initial Tote Bag @ Built it Sew it Love it }


 {Transform lingerie into a Pretty Princess Dress up Outfit @ Vixen Made}


{Dress up Plain Onesies @ My Creative Heart}


 {Check out this great Diaper Bag Tutorial @ Sisters of the Wild West}


{Find out how to make this Chef's hat @ Better Together}


{Make a DIY Painted Shower Curtain @ My Yellow Umbrella}


These are just a few of the amazing Sewing ideas that have been linked up this week. 


My eyes are barely staying open so I am calling it quits tonight, but come by and see all of the ideas -- and link up YOUR ideas and enter to win a  


Camera straps that -- ZIP!


Another Great Idea feature post coming up soon!! 


Happy Sunday! 


xoxo


AD

Related Posts Plugin for WordPress, Blogger...