Pages

Subscribe:
Showing posts with label diy project. Show all posts

Tuesday, August 9, 2011

Kitchen Remodel Sneak Peek -- and a Painted Pantry Door!!


I’ve spent a large part of the summer working on a kitchen/family room remodel.


It started off with my entertainment center redo. And then morphed into painting the kitchen cabinets and island, a slipcover for my sectional, painting my kitchen and other related projects. I think my husband is afraid that this project is slowly encompassing the entire house (shhhhh -- he may be right).


entertainment center beadboard remodel


I have a hard time showing little projects along the way. I always think that everyone likes the complete reveal. My friend Shelley was saying that I should do some updates along the way.


So I thought I would share my pretty painted pantry door today.


turquoise pantry door from the side


I love the turquoise and aqua tones that are so popular right now.


They are so soothing. So much of my kitchen and family remodel focuses on these shades, as well as neutrals like grey and white. I thought it would be fun to add a bright POP of color in the kitchen with a happy pantry door.


martha stewart rainwatermartha stewart lagoon


I mixed a little Martha Stewart Rainwater, along with some Lagoon and painted the door. I found it so much easier to do once the door was taken off the hinges. I used an eggshell finish, but I saw a door that was done in high gloss and it looked awesome. I may be painting it again with the high gloss. I think the contrast would look great against the matte grey walls.


Here’s a before picture:


pantry before


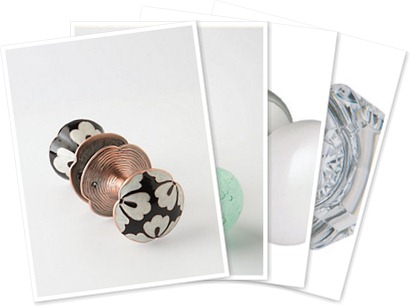
I am still looking for a really cool doorknob to add. Here are a few I am thinking of:


I might just buy another doorknob like the one that I put in my Beachy Laundry Room:


doorknob from laundry room


I also miss my chalkboard on the front – it was a great place to put our menu for the week and who was cooking each night. I have quite a bit still to do on the kitchen – today I am working on making some DIY no-sew Roman Shades. Plus, I have a wall treatment I am doing on two of the walls. And a few other things before the big reveal!!


turquoise pantry door needs


 Here are a couple more sneak peek pictures:


kitchen desk


 {this is the color of the kitchen island -- isn't it fun?}


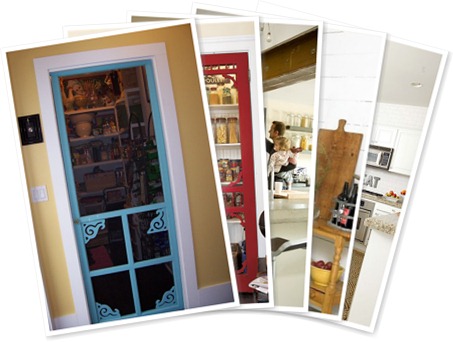
In the meantime – look at these fun painted pantry door ideas. It’s a great way to bring a POP of color into your kitchen. And if you don’t have a pantry, what about an interior door?


View album


1. Blue Screen Door -- Coastal Living

2. Red Screen Door -- Country Living

3. Chalkboard Door -- Apartment Therapy

4. Brown Painted Door -- C Designs

5. Blue Painted Door-- Me & My


Have a {Happy} Day!!


xoxo


PS -- Come over and join me in the International Coffee talk community. We're discussing all sorts of topics that relate to women. It's a great place to connect with people!!

Thursday, December 9, 2010

Advent Calendar from a Scratch-n-Dent Door!

I was at Ikea a few months ago. And you know that side room where they keep all the scratch and dent stuff? Well I found a big door in there for $4!! I was so excited. The other Ikea shoppers were looking at me like I was nuts. Who is that crazy lady who is giggling about some random, scratched up door?? I was going to make some Christmas Subway Art with it, but the wall I wanted to put it on wasn't big enough for this big old door. So it sat in my garage for a couple months.


Then when I got my Christmas boxes out, I found my little musical advent cones that I made and embellished last year and thought that instead of hanging them on my tree this year, that maybe I could turn that old door into an advent board.
So I headed down to my favorite Home Depot. Did I tell you they offered me a job in there because I show up so much?? hahahaha. I picked up some picture hanging cable and some 0-eye screws.


I decided that the white door was way too white, so I used my little mouse sander to distress it a little. Then I put some Walnut Stain over the whole thing and rubbed it into the the edges real well.  I measured the board and decided that I could make 7 rows of wire 7 inches apart.


So I marked it off with a pencil. And then drilled pilot holes with my screwdriver. And then screwed those 0-eye screw in. Then I cut off some of the picture hanging cable and twisted it around the 0-eye screw really well. I used my pliers to get it real tight. Then I stretched it out to the other 0-eye and twisted it on as tightly as I could. I did that 7 times.


I also found some great keyhole hangers that fit flush against the wall - they are great.


I love this project because I am using it as an advent board right now, but I plan to leave it up all year. It can be a message board and a place for the kids' to hang their artwork, messages, pictures or other cards that we get throughout the year.


See how practical I am???


Here is the tutorial if you want to make the Advent Cones. 

And there's also a free template printable there so you can cut them right out.


I went to the Dollar Store and filled my cones with some awesome stuff -- they had chocolate coal at the Dollar Store, isn't that fun? Plus, I found holiday erasers, pens, lollipops, and pencils. And on the 24th I am going to put in Movie tickets in envelopes and we are going to go see a Christmas movie together that day!!
And to go along with each day, I have added an activity.
Here's the advent list I made up for this year:


Watch It's a Wonderful Life
Wrap Up Christmas book and then open one each day.
Make Christmas Cookies and doorbell ditch them to the neighbors.
Find Mistletoe, hang it in our house and kiss under it.
Address and Mail Christmas Cards
Go to Bookstore and buy a new Christmas book to read.
See The Nutcracker
Have a Cookie Exchange
Go Ice Skating
Decorate Gingerbread Houses
Ride Trax downtown to see the lights.
Make a snowman and then drink hot cocoa.
Go sledding
Do a kind deed
Make a gift basket for a lonely neighbor or friend
Have a Snowball Fight
Make and Deliver neighbor Gifts
Talk about Christmas in other countries
Make a Gingerbread house
Decorate the Tree
Make Homemade Marshmallows and Fudge
Make Fondue and eat it watching Miracle on 34th Street.
Drive around to see the lights.
Go caroling
Act out the Nativity Story
Open one gift before Christmas
Make Rice Pudding with 1 almond, then give a present to the person who gets the almond.
Ride the Christmas Train
Go to the movie theater and see the latest Christmas movie.
Hang the picture of Grandpa and fill his stocking with memories
Write a letter to Santa
Make sugar cookies
Sign up for the Giving Tree and buy items for a needy family.
Host a Christmas Eve Brunch and invite all of our friends.
Clean out old toys to donate to children in need
Watch Elf
Go to a Christmas Concert
Watch It's a Wonderful Life
Make gooey Caramel Corn


Do YOU have an Advent Calendar -- if so, what kind do you use?


xoxo


PS -- I am working on a Ruffle Tree forest today. The tutorial will be coming up tonight or tomorrow :)


PPS -- Don't miss the Tatertot and Jello Facebook Giveway TODAY ONLY

and win a RED or GREEN Mugsy and Lulu Madcap accessory!!

http://mugsyandlulu.com/publishImages/index~~element27.jpg

http://mugsyandlulu.com/publishImages/about~~element35.jpg


Mad Caps -- A stylish way for girls to tame their tresses. Part headband, part bandana, all comfy ringspun cotton, the madcap is the stylish solution for girls on the go.


Great for under a helmet, the madcap keeps hair from falling into your sporty girl’s eyes. For non-sports, the kerchief-style madcap is a cool solution for girls.The cap is available in 8 fun colors to match all of your stylish one’s outfits.

Friday, November 19, 2010

Guest Project -- Create a Festive Candy Cane Holiday Sign!

Hi Tatertots and Jello Readers!! I'm so excited to be here today.


My name is Bev and I blog over at Flamingo Toes.


Flamingo Toes is my place to share sewing, crafting, and jewelry tutorials - as well as pretty much anything that pops into my head.


Some of my favorite things to do are knockoffs - and that is what we are doing today!


I have a fun Christmas Sign tutorial for you - 
my Candy Cane Kitchen Sign!


Isn't it fun and vintage-y?


I got the inspiration for this sign from this super cute plate I found at Pier 1.


http://media.pier1.com/img/pier1com/productimages/2470880.jpg


I just fell in love with the design but I decided I needed it on a bigger, grander scale.


Here's what you'll need to make your own:


• 1 - 1x6 piece of wood, cut into three 16" pieces


• Glue


• Craft Paints & a variety of brushes


• Base Color Spray Paint


• Freezer Paper


• Exacta Knife and Cutting Board


• Sandpaper


• Iron


• Design Patterns - Click Here to Download


I started off by recreating the design on my computer. Then I took each segment and made a separate paper pattern for each. You can skip that and use the Design Patterns I created if you want.


Glue the three sections of wood together, along the long sides, so you make one large square. Clamp the wood together while it dries.


You can skip this next step if you want, it's your call.


Go out to the garage and check your wood - and realize you've glued it to the concrete.


Say some fake swear words and pry it up with the hugest screwdriver you can find. Nice.


Consider setting your boards on something else, or upright, while they glue.


Once your boards are glued together, spray paint the front with your base color.


I used a Burgundy but it wasn't quite dark enough, so I did three coats, one Burgundy, one Black, and the last Burgundy. That gave me the nice dark red color I was looking for, with the added benefit of another layer of color that will show when it is distressed.


I believe you could do several of these next steps with a Silhouette or other cutting machine. I do not have a magical machine so we'll be doing this old school.


Cut out all your pattern pieces. You will need to tape several of the large pieces together since they are too big to print out on one sheet of paper. On the "Cane" Pages, I've left the outline of the word "Candy" so you will know how close together to place the words.


Layout everything on the boards to check your placement.


Trace the designs onto Freezer Paper. Leave enough room around the designs so that when you paint, there is plenty of Freezer paper around the stencil.


Paint your base colors on the sign with your craft paint. I used a light turquoise, a dark red, and a dark blue.


Cut out your stencils. I used an exacto knife on a self-healing cutting mat.


You don't need to worry about the little snow marks or the windows. You can add those details back in by hand later.


Lay the tree stencil at the top of the board so that the bottoms of the trees just barely overlap into the red section.


Lightly iron on the stencil.


Here are some tips for ironing onto wood.


• You don't want the iron super hot. It will cause the paint to bubble excessively. We want a little of this, because it will help with distressing, but not too much.


• Be careful to keep the iron on the freezer paper. Use the tip and sides if you need to. Paint WILL come off the wood and onto your iron. If this happens use a balled up damp paper towel and wipe it off while the iron is hot.


Once the stencil is in place, paint the trees and house red.


While that is drying you can do the same thing with the Kitchen and Bakery stencil. I did the little stars by hand, and I used the same light turquoise paint that was at the top.


For the letters that had pieces inside (B, E, and A) I cut those little pieces out separately and then placed them in position before I ironed it on.


After you paint in the designs, lift the stencil. You could have some base paint come off, because of the ironing. This is fine. Saves work later.


There is a chance that the paint will leak under the stencil just a bit. Once the paint dries, just go over the edges a bit and paint over those little sections with a tiny brush. This will clean everything up.


In this picture you can see the stars, the snow on the trees, and the windows of the house. You can also see where some paint came up with my stencil. Cool huh?


Next steps are the large green circle, the candy cane, and the snowflake on the top right.


For the candy cane, I stenciled in a lighter red than the base red, and then painted the white stripes by hand. You could make two stencils if you don't want to free hand it, and then stencil the white once the red has dried.


Once the green circle has dried, stencil on the other snowflake.


Last stencil - the Candy Cane lettering!


That looks pretty awesome, but it's way too "new" looking. Time to distress! Or in other words - scrape off some of your previous hard work. ;)


For the distressing, I sanded all four edges. I used smallish pieces of freezer paper at different parts on the sides and ironed them on, then pulled the paint off.


Then I sanded some of the lettering and shadows. I finished with a light sanding in both directions over the whole sign.


Here are some close ups of the distressing.


And we're all done!! So much more fun than a little plate right?


I hope you enjoyed the tutorial!!


I'd love for you to come say "hi" at Flamingo Toes. 
Here are some of my other favorite knockoff projects . .


Anthro Paisley Rebirth Necklace


Thanks so much Jen for having me over - it was pretty much the highlight of my month. ;)
Beverly - that sign is so awesome. 
What a great tutorial. Thank you so much for sharing it with us!  
Be sure to check out Flamingo Toes!! 
 And here are a few other fabulous tutorials from Beverly that I love: 


http://www.flamingotoes.com/wp-content/uploads/2010/11/P1019884.jpg


Thanks again Beverly! 


And, check out My Chihuahua Bites today -- Andrea is starting a new series, Ask a Mom, with a different mom each week answering questions. It's going to be a fun series - hopefully we can all learn from each other. And guess what?? I'm the mom this week! I am spilling all about my crazy life!


PS -- It's Friday! The Weekend Wrap Up Party starts at 6 pm {MST}. I can't wait to see what YOU have been working on!!


xoxo


This post brought to you by

AD

Related Posts Plugin for WordPress, Blogger...